Pages

Showing posts with label Tutorial. Show all posts

Monday, July 22, 2013

An easy present for boys!

To make this envelope cushion cover to fit a 45cm square cushion you'll need:
A piece of yellow material for the Lego man and a Lego man template. You can make this any size you like. 
A piece of fusible interfacing so you can iron your Lego man onto your cushion fabric. 
Cushion fabric - three pieces measuring 18"x18" (the front of the cushion), 18"x14, and 18"x12" (the two back pieces which will overlap creating an envelope opening. No zips!!!)

Print out and trace your Lego man onto your fusible interfacing then iron that onto your yellow fabric. The interfacing I use is double sided so I ironed it onto the yellow fabric then cut out the yellow Lego man, peel off the backing and...


These pieces will still measure 18".  You are folding, ironing and sewing the 14" side and 12" side. 


I like to use my 14" back piece first, then the 12" inch piece.  This gives the rear of the cushion a nice long covering on its envelope back. 

I say this with my tongue firmly in my cheek! I am very much in the camp of 'close enough, good enough' with my sewing, cutting and measuring!


I've made two of those now for boy's birthday presents this weekend. I may add a mini figure with them for good measure in case the birthday boy's are not huge fans of soft furnishings! 
 
Told you it was easy!

Tuesday, June 4, 2013

My creative space...

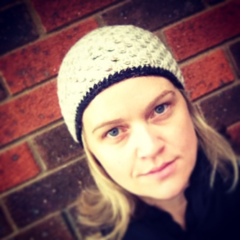
I made a beanie.  With granny trebles.  And no pattern.  Why have I not done this before? 
So super easy.
 
Prompted by a chilly morning at under 9 football on Sunday where many a mum was adorned with some kind of furry, puffy, vesty/jackety number, scarf and woolly headpiece, I felt the need to join the group... (although I vow to never venture into a puffy anything!  So not flattering... on me anyway!)
 
I can't believe how easy this was and how quickly it comes together.  And although I made a few little errors which required some undoing and redoing, it used only a ball or so of wool. 
(Initially I tried to add ear flappy bits with plaited ties hanging off them but then it dawned on me that I am not a 17 year old babe waiting on the beach for my surfie boyfriend to return from the waves and join me!)


The Pattern.... (I'm assuming you have some crochet knowledge!)
 
Chain  5 or 6 and join with a slip stitch to the starting chain.
Double crochet 12 times into the ring and slip stitch to close.
Treble into each previous double crochet adding some space between these trebles by chaining two or three.  Join with a slip stitch.
 

In the next round, three chain and two trebles into the first space, and then three trebles into each space after that.  Join with a slip stitch into the third chain of your three chain starting point.
So your beanie doesn't start folding in too early, increase your rounds slowly and keep testing it out on your own head.  Initially I increased by adding a few chains between each set of three trebles.  Then increased some more by doing two lots of three trebles with a chain in between in each alternate space of the round.  I did an increase round, then a non increase round 2 or 3 times till I felt it was going to be wide enough to fit my moon head.
 

Eventually you will end up doing those three lots of trebles into each space with maybe a chain between each set 9-10 times till it comes far enough down your head.  To finish I used a different colour and did three rows of double crochet around the edge.  I may well add a pom pom!
 
Take it out onto your front porch and take 22 selfies before you find one that you are vaguely less critical of.  Muck around with it on instagram until you find the most flattering filter while your internal self continues to berate your moon head, the bags under your eyes,  pointy chin and puppet lined mouth.
 

Enjoy at a cold under 9's football match where you lose count of how many times your child pulls up their socks and repeatedly removes their mouthguard... while only touching the actual football twice. 


Friday, December 16, 2011

Pretty Panel Skirt: A Tutorial

Remember when I guest posted over at Emma's simple handmade gifts for girls series?

I showed you how I made simple skirts for little girls.  I have made so many of them now, I can literally whip them up in half an hour or so.

Yesterday I decided to get a bit tricky and fancy this skirt up a bit more!  I am such a thrill seeker!  I am calling it

The Pretty Panel Skirt!

So, what I think you should do, is pop over to Emma's and read about making a simple skirt just so you have the basics down, then come on back here and I'll show you how I added the pretty panel in....


Righto,

Grab your materials.  Here I am using a spotty blue fabric as the main part of the skirt, some pretty floral as the panel and then just to be super fancy I am (of course!) adding a babushka dolly to the panel to pretty it up even more.

 Measurement wise, I made my panel the same length as the skirt and about 7 inches wide.  Really you can make it as wide as you like.  I made it wide enough to add the sweet dolly on.

Lay out your main fabric right side up and then line up the edge of your panel fabric right side down to one of the edges of your main fabric.  Sew down that edge.  In the picture below, I have sewn down the right hand side.

Turn this over now and line up the other edge of your pretty panel with the other edge of your main skirt fabric and sew down that line (again, in the image below this is down the righthand side.

Press your seams open so they are nice and flat and turn it out the right way and you should end up with this...

Now you can just go back to the simple skirt tutorial and create your hem as normal and maybe your waistband too.  If you would like to pretty your panel up even more as I have done with the dolly, leave your waistband for now.

To add my dolly I ironed her onto some visoflex (do I have that spelled right???) then cut around her gently and then ironed her onto the fabric panel.

To make her even more secure I then zigzagged around her edges.

Once you have done that you can go ahead and make your waistband following the same instructions you would use in the simple skirt tutorial.

All done?

Does yours look like this?


Pretty, yes?  And definately fancy!

I hope this all made sense.  Please feel free to ask questions (although I am not sure I will know the answers!)


Wednesday, November 9, 2011

My creative space... I can sew a rainbow!


When I spied this Rainbow skirt tutorial over at Aesthetic Nest I knew I had to attempt one for Miss Matilda's rainbow party next month!


The problem was the whole wrap around concept that this tutorial uses was a little mindboggling for me (it required making a buttonhole and me and buttonhole making have not got a good relationship at all) and I really wasn't too fussed about the whole white ribbon tie at the side.  I figured I could create a simple elastic waisted skirt by modifying it a wee bit and this is what I have come up with.

I mostly followed Anneliese's tutorial right down to step 2.  Her instructions for working out the measurements you need for each panel of colour are easy to follow.  I think you should read through her tutorial as it is much clearer than mine and it might make what I have done make more sense if you see where I was coming from.  Also, I have used 12 colours in my skirt because that's how many were in the fat quarter bundle of fabric I purchased at Spotlight for a bargain!

My version of this fabulous skirt starts here:
Once you have measured, snipped and joined your rainbow panels together and cut out your lining fabric piece to the same size, place them right sides together and sew only the bottom long length together.

Here I have spread the entire skirt out flat so it is one big rectangle with the coloured panels on one half and the white lining on the other.


Next, fold the two short sides of your rectangle together like so...
...and stitch from the top of the white fabric through to the bottom of the rainbow panelled section.  In the picture above this would mean from the top right corner down to the bottom right corner.


You should have a big cylindrical shape skirt that you then need to fold so that the wrong side of the rainbow panel and the wrong side of your lining fabric are together.  This will give you your bottom hem.  Below is a picture of my sausage fingers holding that bottom hem open (even though it's at the top of the picture!).

Now to make that hem nice and secure follow Annaliese's instructions again and sew right around the bottom of your skirt very close to the edge.  Just like I am doing below!


Now, look how messy and untidy the top of my skirt is?

Solve this by sewing the lining fabric and the rainbow panels together about a centimetre from the top and then just snip all those dags right off!  Highly professional sewing going on right here!

Ok, the next bit involves gathering the top of your skirt together so it fits the small person it is intended for.  This involves a basting stitch which my sewing maching and I don't love.  I discovered the best thing for me is to use a nice strong cotton and hand sew a long running stitch across the top right around then grab the two ends of this cotton and gather and spread your material to your hearts content.


Well, gather until it's as wide as it needs to be anyway!

To create your waistband cut yourself a nice wide piece of your lining fabric.  I used the above 12 inch gathered waist measurement, doubled it and then sewed the two ends together.  It was about 5 inches thick.  In the picture below you can see I have ironed some creases into it (kinda of like you are creating bias binding) so all your messy edges are hidden away.  Pin and sew one edge of your waistband to the inside of your skirt and then you can remove that basting stitch we made because your waistband is now holding all those nice gathers together.

Fold your waistband over to the outside of your skirt and pin and sew again leaving a nice little spot to insert your elastic into the waistband.
Sew your elastic ends together, neatly sew your waistband gap closed and

TA DA....
One gorgeous Rainbow Skirt!
Or two!
The smaller one is of course for Miss Matilda and the bigger one is my very first piece of commissioned sewing that someone is going to actually pay me money for!!!  Yay me!  Although I really don't know how many $$$$ I should be asking.  Any thoughts?  What would you expect to pay?
Hope these instructions are clear enough for you but if you have any questions feel free to ask.  I would also like to make it really clear that the original Rainbow Skirt idea and fabulous tutorial comes from Anneliese at Aesthetic Nest.  This is just my modified version of it.
Have you signed yourself up for my wee lego giveaway to be drawn on Monday 14th November?